
So, you’ve decided that you want to do a multi-day hike in Torres del Paine but need help planning and booking your trip. Even to camp in the park, you need to register and book campsites ahead of time. This is strictly enforced and camping is only allowed in official locations. There are hostels and pre-made camping locations throughout the park, allowing you to participate in these multi-day treks without having or carrying your own gear. All of these must be booked in advance and do sell out.
The following are the tools that we used to book our trip.
W Trek and O Trek FAQs
Is the W Trek Worth It?
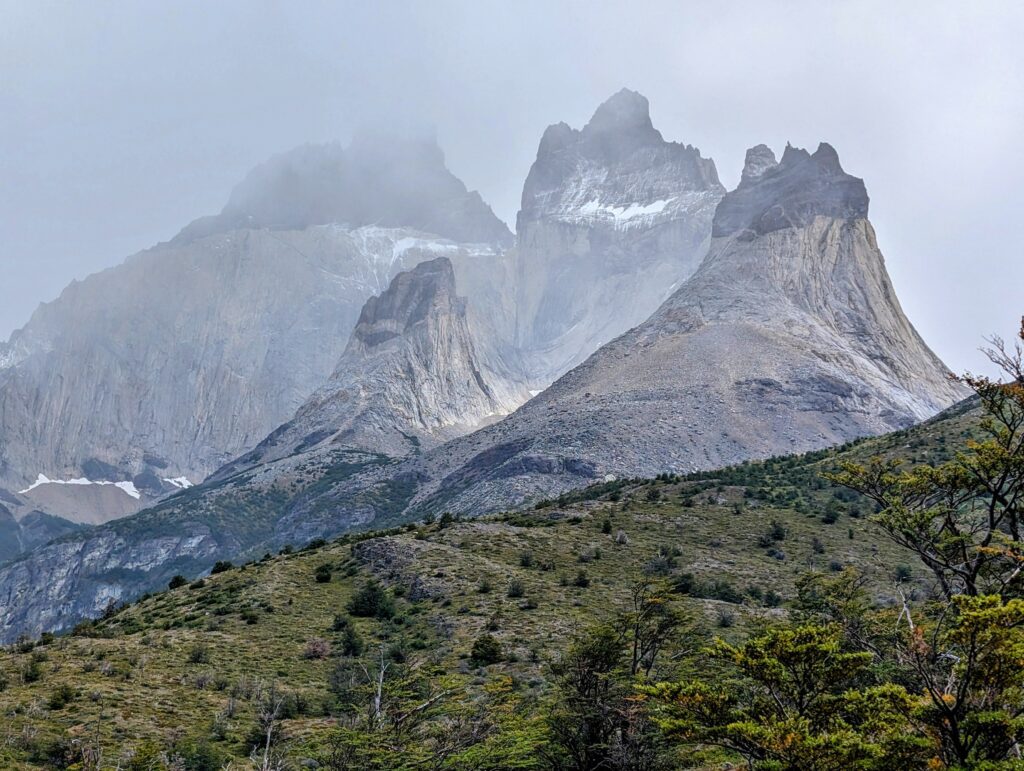
If you enjoy hiking and want to see some incredible and iconic landscapes, the W Trek is for you. You do not need to be an incredibly strong hiker or camper to do this trek, but you do need some level of fitness. The advantage of this multi-day hike is that you truly have all day to get to your next campsite. In addition, the elevation of this trek is so low that you will not be affected by elevation when doing the hikes. The variety of landscapes, mountains, lakes, and glaciers make this trek worth it. And there is a great sense of accomplishment when completing the walk.
The infrastructure that is constructed throughout the trek can really be used to your benefit. Because of this, the W trek is a great introduction to multi-day hikes.
Is the O Trek Worth It?
The O Trek is much longer than the W Trek. It is for people with more experience hiking as the length may be a significant challenge. If you are looking to challenge yourself and have more experience with these multi-day treks, this one might be the one for you. The highlight of the O Trek is a pass that leads to incredible views and walking along an enormous glacier. This is a unique experience that you may not be able to get elsewhere. The O Trek also has very strong infrastructure, making it a great step into long multi-day hikes.
How Long is the W Trek? O Trek?
The W Trek is 46 miles (74 kilometers). It takes 4-5 days to complete.
The O Trek is 74 miles (120 kilometers). It takes 7-9 days to complete.

How Hard is the W Trek? O Trek?
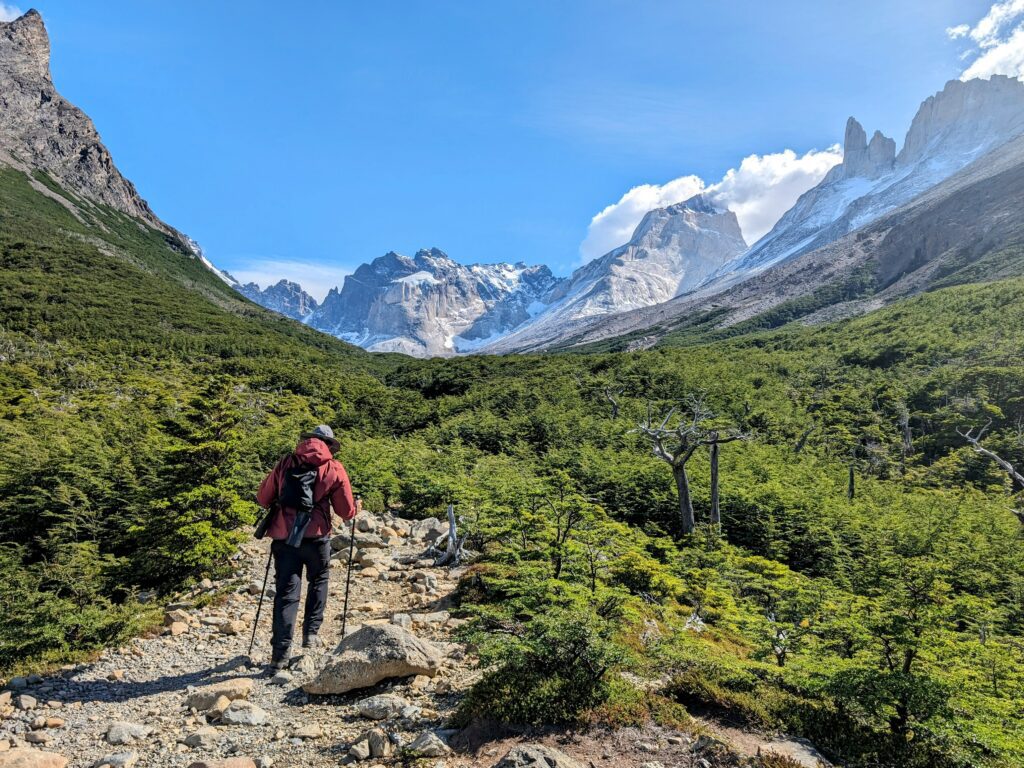
Difficulty is relative and the treks are both mental and physical challenges. Consider how much you can walk and stay on your feet on a normal day. Typically, you will have to walk 12 miles (19 kilometers) a day. However, you would be surprised how much your mind and body can push yourself to go further.
There are a few things that could make these treks harder or easier. If you choose to bring your own camping equipment and food for the trek, this added weight will challenge your hikes. However, this will keep the cost of the trek at a minimum.
How Far In Advance Should I book my Campsites on the Trek?
The campsites often book up very quickly, especially when they open registration for the upcoming season. You may be able to start booking as early as August for the upcoming season. The peak of the hiking season is January – beginning of March and this is where you will have the most difficulty booking your lodging. If you did not plan in advance, don’t worry too much! With some flexibility, you can still find openings for the different treks. Use the “How to Book Your Accommodations for Multi-Day Treks” section below to find the appropriate availability. Campsites have different cancelation policies (between 45 and 90 days prior to the reservation). Because of this, we found openings pop up if we looked 45 or 90 days out.
The Two Different Trek Options
W Trek
The W Trek is the most popular multi-day hike in the park. It follows valleys through the mountains to see viewpoints, glaciers, and lakes. While it can be done in 3 days, to maximize your time and views, it is best to spend 5 days doing the hike. With less than 5 days, you may have to miss one or more of the main viewpoints of the hike.
There are two directions in which you can do the W Trek. The following are the refugio/camp options based on the direction in which you are starting:
Direction 1 - East to West:
In this direction, you will start with one of the hardest hikes. Your second day will be more downhill, especially if you are staying at Chileno. Your easiest days of hiking will be at the end of the full trek. To start, you will take the first bus from Puerto Natales to the park entrance. Here, you will take a second bus (cash only) to the welcome center to start your hike. The following is the order of the refugios that you should reserve.
- Chileno (preferred) or Torres Central
- Frances (preferred) or Cuernos
- Paine Grande
- Grey
Direction 2 - West to East:
In this direction, you will end with the most iconic hike, making a truly rewarding finish to this achievement. We did not do the hike in this direction but because the O Trek is also in this direction, you will be hiking with others. To start, you will take the first bus from Puerto Natales to Pudeto. Then, you will take a catamaran to Paine Grande and start your hike. The following is the order of the refugios that you should reserve.
- Grey
- Paine Grande
- Frances (preferred) or Cuernos
- Chileno (preferred) or Torres Central
O Trek
The O Trek can only be completed in one direction. However, there are two starting points for the route. This is truly based on the availability of campsites throughout the trek. Option 1 is the more traditional option.
Direction 1:
With this option, you are ending with the most iconic hike. Your hardest hike is towards the beginning/middle of your trek. To start, you will take the first bus from Puerto Natales to the park entrance. Here, you will take a second bus (cash only) to the welcome center to start your hike. The following is the order of the refugios that you should reserve.
- Seron
- Dickson
- Los Perros
- Grey
- Paine Grande
- Frances (preferred) or Cuernos
- Chileno (preferred) or Torres Central
Direction 2:
With this option, your hardest hike is towards the end of your trek. This is the best option if you want to add on an additional evening at Refugio Grey and get some time doing glacier excursions. To start, you will take the first bus from Puerto Natales to Pudeto. Then, you will take a catamaran to Paine Grande and start your hike. The following is the order of the refugios that you should reserve.
- Frances (preferred) or Cuernos
- Chileno (preferred) or Torres Central
- Chileno or Torres Central (preferred)
- Seron
- Dickson
- Los Perros
- Grey
Where Costs Can Vary on the Trek
Now that you know what your different options for visiting the park are, let’s talk about the cost differences. This can help narrow down the best trip for you. You can truly choose your own adventure, marrying your budget with the amount of camping that you want to do. The factors that will affect the cost are the following:
Sleeping Arrangements
Each stop on the hike has designated areas to sleep.
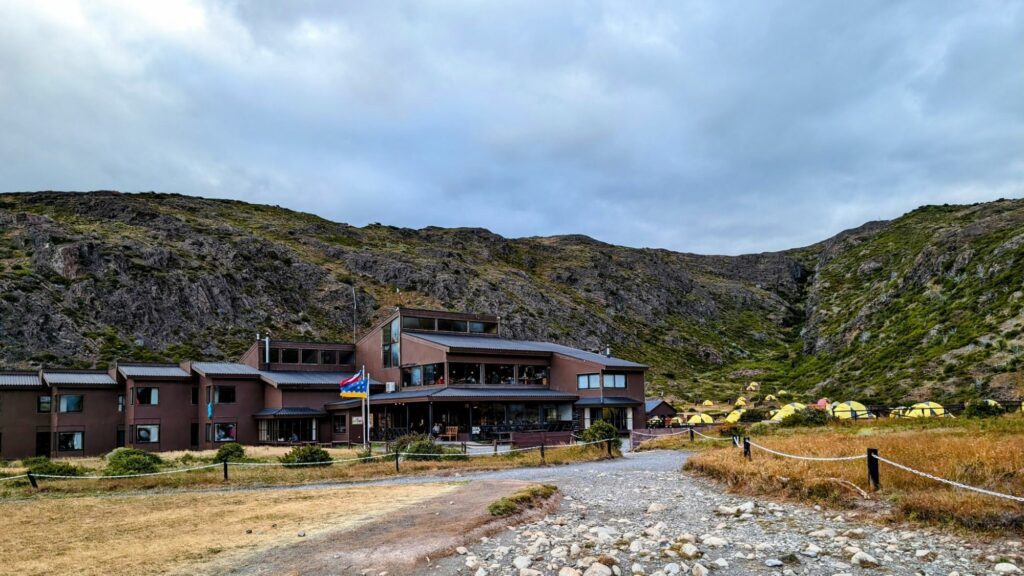
Refugios with Bunk Beds
The most expensive arrangements are the refugios with bunk beds. These provide bedding, have heating, and are protected from the wind/elements that are often unpredictable in this region. You will have to share the space with other hikers. If you are traveling solo, these bunk beds are less expensive than the following pre-assembled tents.
Pre-Assembled Tent Accommodations
These stops also provide pre-assembled tent accommodations with thick sleeping pads and sleeping bags. When traveling as a pair, the tents are less expensive than the refugio bunk beds. You can also get these tents without the sleeping bags if you prefer to bring your own.
Camping
The final option is reserving a camping site and providing your own tent and materials. If you don’t want to carry a sleeping bag with you, this is something that you can pre-order and rent from the different sites, provided they have them available. While this is the most affordable option, it will mean that you will have to carry your own camping materials.
Food Options
The refugios all provide food for hikers. You can pre-reserve meals, purchase meals a-la-carte, or bring your own food while hiking in Torres del Paine.
Pre-Reserved Meals
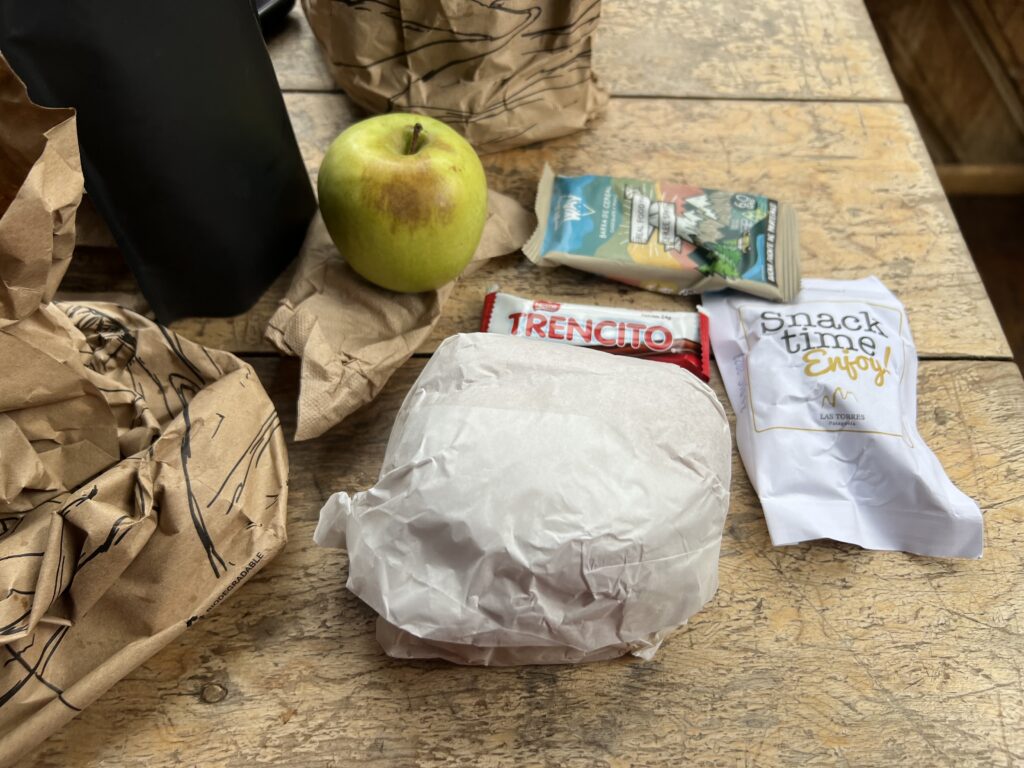
The refugios make breakfast, dinner, and a lunch box every day. You can choose to specify a meal period to purchase, purchase the full board (all the meals), or opt out of the meals. The food always included protein, carbohydrates, vegetables, and dessert, making sure that it was nutritional for all the hiking. There was always an option for vegetarian meals as well.
To us, dinner and lunch had the most value for the price we paid. Both were rather filling and the lunch boxes included many snacks that we could eat throughout the day. Breakfast was the most underwhelming of the meal periods and we felt that we could have brought energy bars to fulfill our needs. The pre-reserved meals are rather expensive, but, as a result, you do not need to bring food with you. Part of the premium pricing is due to the challenges that they face getting supplies to these remote refugios.
A-La-Carte Meals
The other option that you have if you do not want to bring food is the a-la-carte meals. These can be purchased from the refugios instead of bringing food or pre-purchasing meals. These were typically burgers or quesadillas and could not be purchased when people were eating the reserved dinners. This option was less expensive than the pre-reserved meals. Because we had booked all our meals, we did not have the opportunity to try these out.
Bring Your Own Food
The final option is bringing your own food to cook within the park. You can purchase these supplies in Puerto Natales, the town closest to the national park, or Punta Arenas, the largest town in the area. You can only cook in designated areas in the refugios, due to some damaging fires that were caused by tourists historically. There are also some minimarkets during the trek where you can purchase supplemental food supplies and snacks.
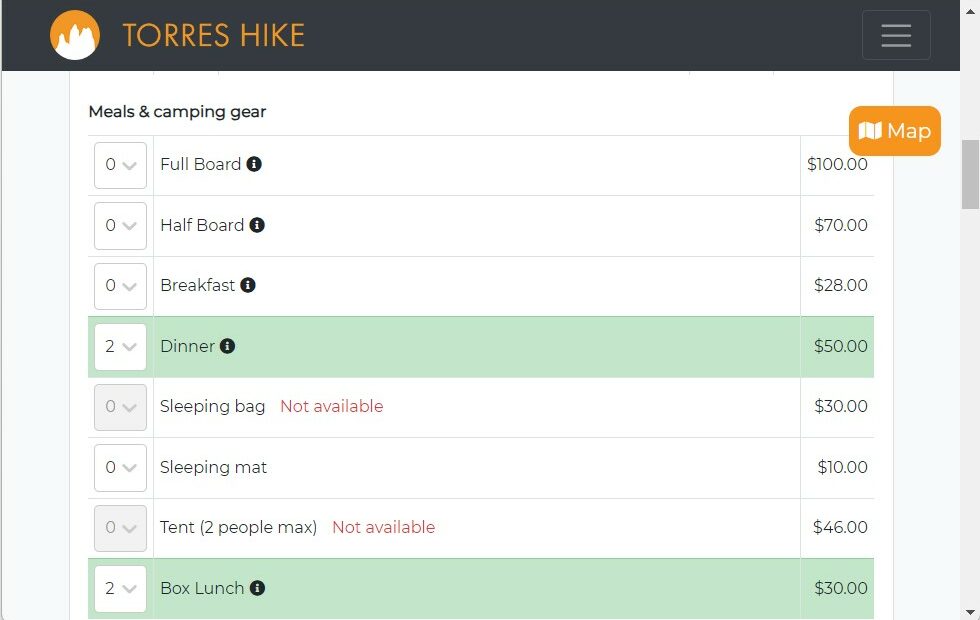
The following chart shows how camping and food prices could have a great impact on your expense on this trip.

How to Book Your Accommodations for Multi-Day Treks
The reason that booking the treks is so challenging is because the accommodation locations are privately owned by two separate companies. As a result, to book the full trek, you will need to determine logistics from two separate websites that are not connected. Let’s start with explaining how the accommodations on the W and O treks work. If you have the time and patience to figure out the accommodations in this way, it will pay off because it will be the most affordable and direct option for reserving the trek.
If you want to pay the least amount of money and you have time to figure everything out…
Websites for the Refugios and Campsites
There are two companies that individually own the different campsites along the Torres del Paine treks. The following map shows the companies attached to each of the campsites:
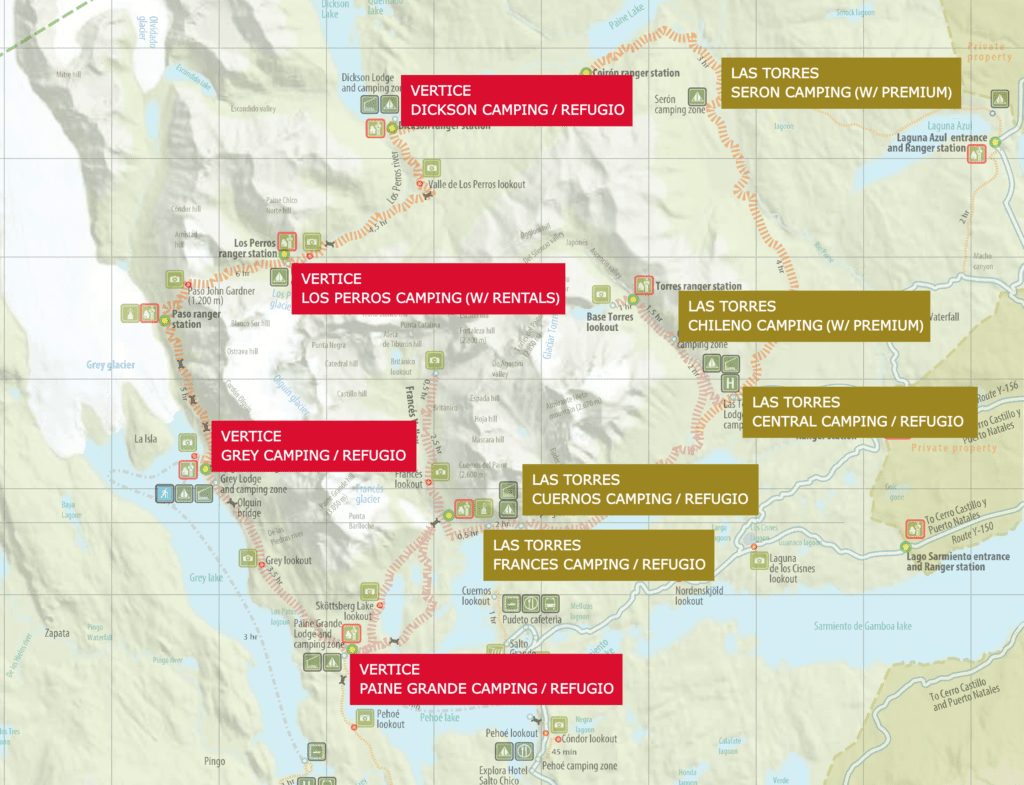
To reserve your campsites, you will need to determine the dates that work for both companies, based on the schedule you want. You may have to go back and forth between the websites to find the right dates. You will need to know the order in which you want to stay in each campsite and the dates for your trek. The websites are not flexible and do not offer alternatives if your dates and selections are not available. However, if you are able to piece together your trek, this will be the least expensive way to reserve your trip.
If you are struggling with any bookings, you can always send them a note over WhatsApp and they can answer your questions. You may need to send your note a few times before getting a reply.
If you cannot get into the refugio that you want (Cuernos vs. Frances or Chileno vs. Torres Central), book the available refugio and continue to check their availability on their website. Sometimes, cancelations happen and openings appear. We were able to switch one of our refugios a few weeks before the start of our trek when we noticed availability. You can only switch refugios if they are both owned by the same company. Fortunately, you will not have to pay a fee but you will have to pay the difference between refugios if there is a price difference. To make the change, send them a message on WhatsApp with the necessary information (name, reservation number, and change request).
If you want control over the logistics of your trip without the tedious effort of booking everything individually…
Tools to Make the Planning Easier
This is the best tool to determine the availability of campsites and book all the different add-ons that you may need. This website is truly the answer to making the booking process easier and more approachable without using a travel agency to book your trip. The way that the website is designed makes it feel like a “choose your own adventure” but there is a learning curve to get the best results that you want. Here is how to navigate the website to determine the best logistics for your trip:
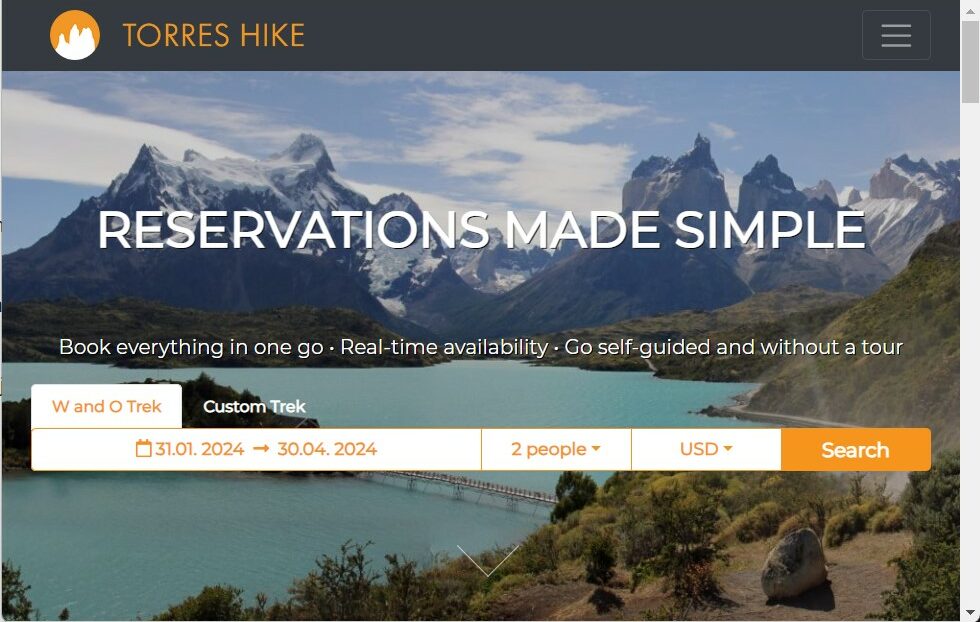
1. We are going to start with the W and O trek tab.
2. The first thing you will want to do is put in the dates that you have available to do the trek. The key here is to put in the widest range possible for your trip. If you have the whole month of February available to do the trek, make your date range to be from February 1 to February 28.

3. The search results that come up are all the available excursions within the time frame that you have established. The results will show you the order that you will be staying in each campsite/refugio. If you have a preference with the order, pay attention to these names.
4. You can filter between the W and O treks to the left. If you are dead set on using refugios or camping, you can filter those selections as well. However, if you are flexible with your accommodations, keep both selections selected. For example, we were open to staying in both the premium camping options and the refugios so we kept both options on. In campsites that do not have premium camping, you can also rent a tent, mattress, and sleeping bag. Maintaining that “camping” selection does not mean that you will be carrying all the gear with you if you don’t want to.
5. Select the dates, length of trek, and refugio order that best suits you. I recommend 5 days for the W trek and 8 days for the O trek but this is truly based on your skill level. As you scroll through your selection, you will see the required logistics to get to that refugio/campsite. It will show you the hiking distances for that day. This will automatically change as you customize your trek.
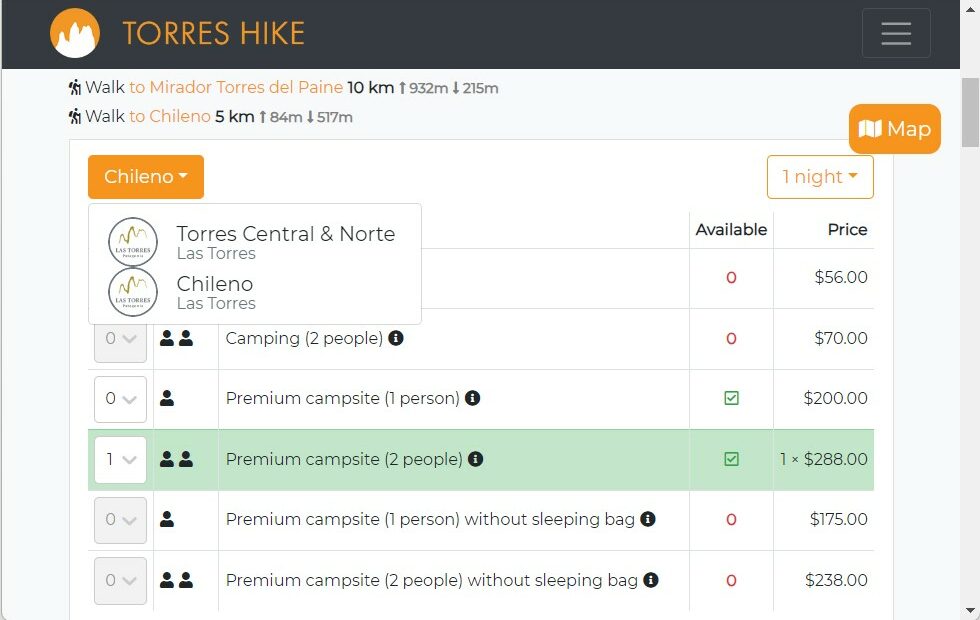
6. Now is where you will get to customize your experience. For the refugios Torres Central/Chileno and Cuernos/Frances, you can choose between the two refugios. This selection happens in the upper left hand corner of that day. As you flip between the two campsites, see how the distances for that day change.
7. Next will be your selection of accommodations. You have a few different options: camping, a premium campsite, or a bunk bed in a refugio. Not every location will have premium campsites or bunk beds. However, even with a camping selection, you can reserve a tent, sleeping bag, and mattress for that location. Those selections can be made after you select your accommodation. If you choose premium campsites or bunk beds, these accommodations come with the necessary bedding and you do not need to reserve additional sleeping bags or camping gear.
8. The next piece will be determining the food that you want to purchase. You can read more about your food options in the section about cost variables.
9. You will continue to do this for every campsite location.
10. When you are done, you can check out with your perfect itinerary.
Now if you want to extend your time at specific refugios (such as Refugio Grey to spend time on the glacier), you will put the order in which you want to stay in the different campsites under the Custom tab. From here, the steps of selecting accommodations and food options are the same as above.
If you don’t have time to figure out any logistics…
Using Agencies to Book Your Trip
The easiest way to book your trip is through a travel agency. Two that are extremely popular are Booking Patagonia and Las Torres. There are other companies that can help you book your travel as well. You put in your preferred dates and tell you the availability of the trek. With these sites, you can book the O-Trek or different W-Trek options. These sites are best if you have a set date that you can do the trek. Otherwise, they can be frustrating, especially later into the season when campsites become booked up.
If you run into these frustrations while booking your travel, you can always email or WhatsApp these companies to help troubleshoot through your issues.
The advantage of using these agencies is that they book everything for you ahead of time and you do not need to bring additional cash for some of the ancillary costs that happen before and after the hike. All of the bus, catamaran, and shuttle costs will be included and you will receive a package with all the necessary tickets and vouchers. However, you will be paying for it at a premium. If you are very busy, this is the right way to go. However, if you have more time, there are some other options that may be more cost effective.
The following are the additional things that you will need to have prepared for your trek:
The National Park Pass
If you are doing a trek for more than 3 days, make sure to purchase the appropriate pass. As a tourist, you are an “extranjero”.
Bus from Puerto Natales to the Park
We recommend booking this in advance to get one of the earliest buses possible (7 am). If you are starting from the East, you will book a ticket from Puerto Natales (Terminal Rodoviario) to Laguna Amarga (park entrance) and get off the bus at the park entrance. From there, you will transfer to a shuttle. If you are starting from the West, you will book a ticket from Puerto Natales (Terminal Rodoviario) to Pudeto. You will get off the bus at the park entrance to check in and get back on the bus towards Pudeto, where you will take the catamaran.
Bus from the Park Back to Puerto Natales
If you are ending on the west side of the park, your bus will be from Pudeto to Puerto Natales (Terminal Rodoviario). If you are ending on the east side of the park, your bus will be from Laguna Amarga (park entrance) to Puerto Natales (Terminal Rodoviario).
Cash for the Shuttle in the Park
If you are starting on the East, you will take the shuttle after checking in at the park entrance. If you are starting from the West, you will take the shuttle after you arrive at the Welcome Center at the end of the hike. When we did the trek, the shuttle cost 4.000 Chilean pesos per person.
Cash for the Catamaran
If you are starting or ending in Paine Grande, you will also need cash for the catamaran between Pudeto and Paine Grande. For those starting from the East, this will be at the end of your trek. If you are starting from the West, this will be at the beginning of your trek. The heading includes the website with the itinerary and cost of the catamaran.
Downloads of all of your campsite reservations
Your passport
Your PDI document (receipt-like paper that is given when you enter Chile)
Other Expenses that May Come Up As You Plan Your Trek
Here are a few other expenses that came up for us:
Gear Rental
We did not have all the equipment needed for the hike, including backpacks, trekking poles, a rain jacket, and a sun hat. We rented our gear from Rental Natales. They are on the more expensive side of renting gear in Puerto Natales and if you walk around town, you can find other places that will rent gear for less. We continued with Rental Natales because we were able to rent the gear online in advance and they were the only ones that would rent us the clothing that we were missing.
Luggage Storage
If you are staying in a hotel or hostel before and after your trek, you should be able to store your luggage at those accommodations while you are doing the trek. We were staying in an Airbnb before and after our trek and paid a local hotel to store our items. You can always ask your nearest hotel/hostel if you are in the same scenario as us.